
Changing the Sky and Continue Painting Fields and Trees
I tried a slightly different approach when making this video because it’s a little longer, about five and a half minutes. In the silences I have ‘dropped in’ some speach and added a text overlay here and there. I wonder if this works for you.
Some explanatory text and the transcript is below .
Video – 5 minutes 25 secs
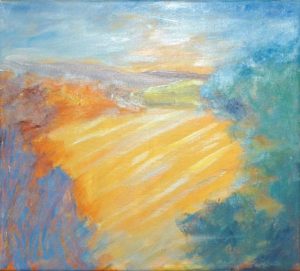
The sky changes with more fast painting. I’m using fast light strokes, colour mixing as I paint.
As before, I want to avoid the colours losing vibrancy or adding too much paint at one time.
Wanting to make use of the colour in the previous layer, I mix on the pallette and wipe off the excess paint before using it on the canvas.
An overloaded brush might deposit more than I want.
I fall silent from time to time while I pay attention to the work – it’s not easy to carry on a running commentary at the same time.
At this stage, I am not overly worried about details – it’s more about getting sweeping strokes and establishing softer areas for the distance.
Stay tuned as I’ll be adding some detail next time:)
There are some noises in there, including the sound of tractors going past in the lane.
I left them in because I wanted you to see how roughly I was treating the canvas, and know that you can get away with it!
Scraping strokes at the bottom of the canvas and scratching with wood is not gentle.
I mumble some reminders to myself as well. Now that Is something I do when I’m painting!
One was to put the lid back on the tube of paint, and it’s a good idea to keep doing so between squeezing out.
A lid left off could make the paint inside dry out, eventually spoiling the whole tube.
At the very least, you might have a solid bit in the neck, and if you squeeze without getting rid of it, it could pop like a cork.
It can squirt paint all over the place, unless you remember to dig it out before you start.
Transcript of this video
Ok, I’m going to do a bit more to the sky, I think.
Using the brush, I pick up small amounts of paint, and then mix and wipe on the pallette.
Strokes are light and quick, and I frequently change the colour mix.
Put the lid back on.
Soften the hedge…
Just a little more in the sky, then a few touches in the field and trees.
Brush strokes get stronger as the paint gets dryer!
The sun’s going down there now – that’s quite good.
Get some light into here, lighten it up a bit.
It’s all in the distance so I’m making this a bit hazier.
Seems like an idea, to go a bit further away.
I’m just going to put in some darker, slightly darker. So that ends up going behind those ones.
So I’m getting my distances a bit more.
Let’s get some shadow under here.
I’ll take that down a touch.
There, I don’t think I’ll leave that like that.
Ok so now, I’ve got – I’ll just clean off my brush down here.
And that yellowy-orange can go further into here.
See, what putting that background does, it doesn’t mean you have to leave any of it really,
but it means if there’s any gaps, they’re not wrecking anything.
It not like a white gleam, unpainted bit so..
There!
As you see, it’s not a question of doing one area, then another area.
You are painting, always painting everywhere, to keep the balance going.
So that you can get a pretty good idea of what’s happening and,
well, so that you can adjust pretty much as you go.